Agent Insights

General Updates - November 2026


Self-Serve PingID Reset

Two-step verification adds an important layer of security when accessing your account. If you get a new phone or need to set up PingID on a new device, follow these steps to reset your verification methods and enroll your device.

1.  Visit myaccount.intermountain.net and select Reset 2-Step Verification/New Phone Enrollment.
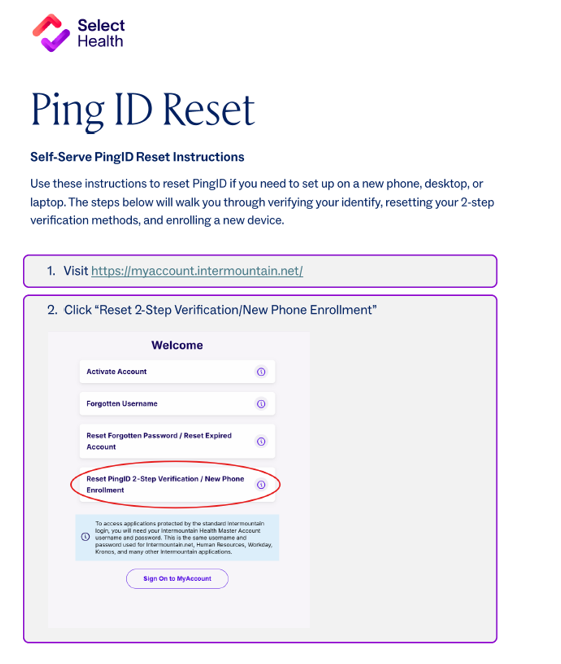
Instructional page for resetting Ping ID from Select Health. The document explains self-serve PingID reset steps for a new phone, desktop, or laptop. It directs users to visit https://myaccount.intermountain.net/ and then click the “Reset 2-Step Verification/New Phone Enrollment” option on the Welcome screen. The layout features purple buttons and text with a clean white background.

2. Enter your username, select Continue to ID Dataweb, and follow the prompts to enter your personal information.
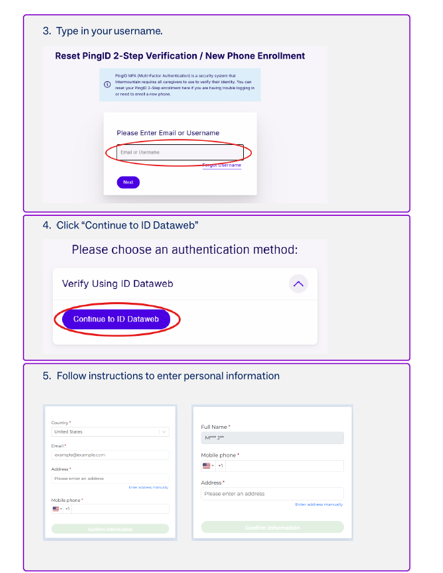
Instructional screens show steps to reset PingID 2-Step Verification and enroll a new phone. The first panel prompts the user to enter an email or username. The second panel highlights the button to continue to ID Dataweb for authentication. The third panel displays a form for entering personal information such as country, full name, mobile phone, and address.

3.  Send an SMS code to the cell phone number you entered, then enter the PIN.
4.  On the next page, select Reset 2-Step Methods.
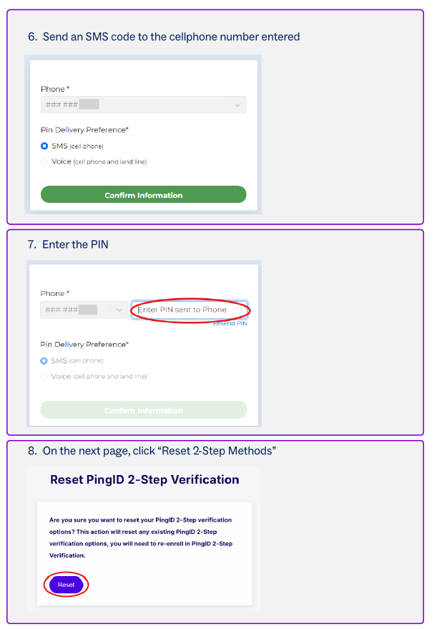
Instructional graphic showing steps to reset PingID 2-step verification using a cellphone. The first panel demonstrates sending an SMS code to the entered phone number and selecting a PIN delivery preference. The second panel shows entering the PIN sent to the phone to confirm information. The final panel displays the Reset PingID 2-Step Verification page with a highlighted Reset button and explanatory text.

5.  For a new phone, select PingID Mobile App. Use the QR code and Pairing Key that appear to authenticate and set up your mobile device.

6.  For a desktop or laptop, select Another Device. Log into the Select Health Portal, select Start on the Welcome to PingID banner, and follow the instructions to download, install, and set up PingID.
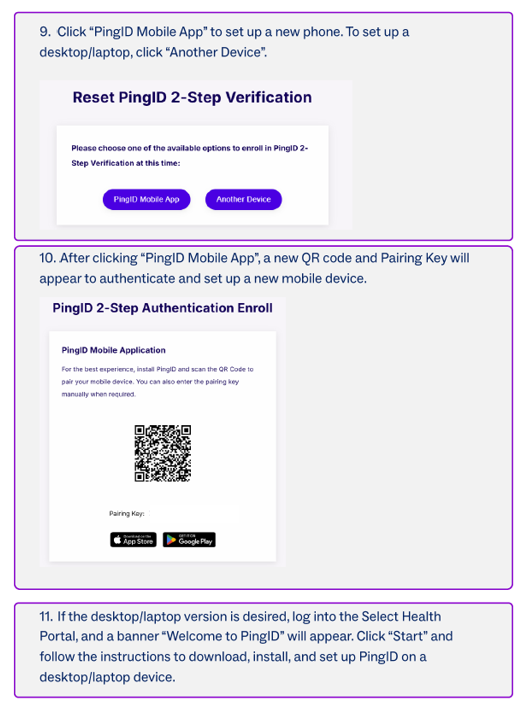
Instructional screenshot shows steps 9, 10, and 11 for setting up PingID 2-step verification. The first panel explains choosing PingID Mobile App or Another Device to enroll. The second panel displays PingID 2-Step Authentication Enrol with a QR code and pairing key, plus icons for the App Store and Google Play. The final panel describes installing PingID on a desktop or laptop via the Select Health Portal.

Self-Serve Password Reset

Keeping your login credentials up to date helps protect your account and the information you access through the Agent Portal. If you have forgotten your password or it has expired, follow these steps to verify your account, create a new password, and get back into the Agent Portal.

1. Visit myaccount.intermountain.net and select Reset Forgotten Password/Reset Expired Account.
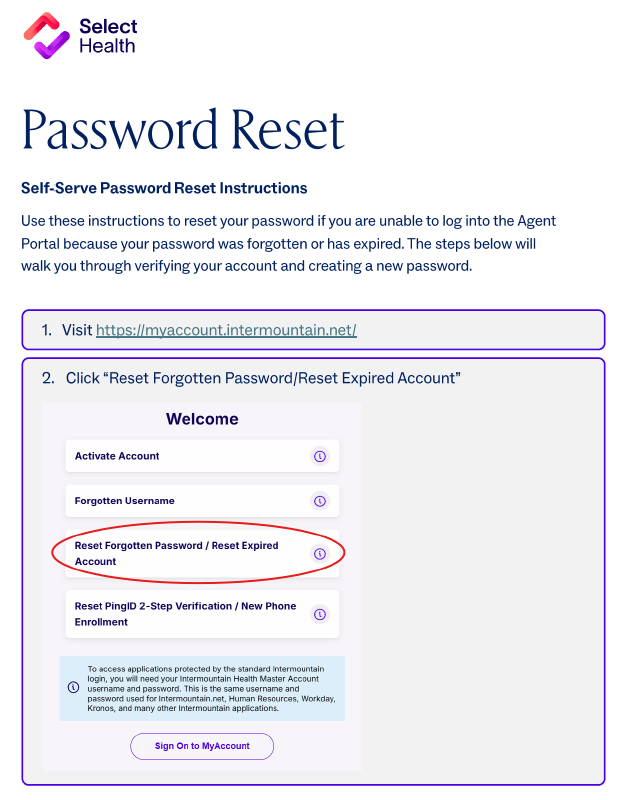
Instructional page for resetting a password on the Select Health agent portal. The document explains self‑serve password reset steps, including visiting the myaccount.intermountain.net website and choosing the reset forgotten password or reset expired account option. The central screenshot highlights the portal welcome screen with multiple account management choices. The layout is clean and professional, using white space and purple accents for clarity.

2. Enter your username.

3. PingID will automatically detect a mobile device. If PingID is working on your device, enter the revolving code. 
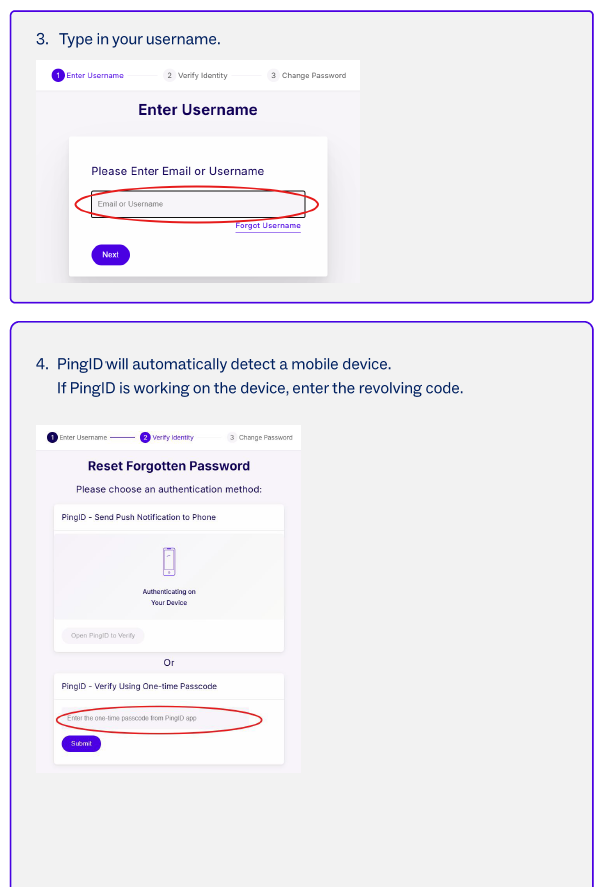
Instructional graphic showing steps to reset a forgotten password using PingID. The top panel displays a login screen with the prompt "Please Enter Email or Username" and an input field labeled "Email or Username" highlighted in red. The bottom panel shows a "Reset Forgotten Password" screen with options for authentication, including "PingID - Send Push Notification to Phone" and "PingID - Verify Using One-time Passcode". Purple buttons and text elements emphasize the interactive actions within the user interface.
Instructional graphic shows steps to reset a forgotten password using an online verification method. The top panel highlights the option to verify using ID Dataweb and a link labeled "Having trouble with PingID? Click here for other options". A button labeled "Continue to ID Dataweb" is emphasized within the reset password interface. The bottom panel illustrates form fields for entering personal information such as country, full name, mobile phone, and email address. Step number 5 is visible, indicating the sequence in the overall password recovery process.

4. To verify using ID Dataweb instead, select Having trouble with PingID? Click here for other options and follow the prompts to enter your personal information. 

5. Send an SMS code to the cellphone number you entered, then enter the PIN.
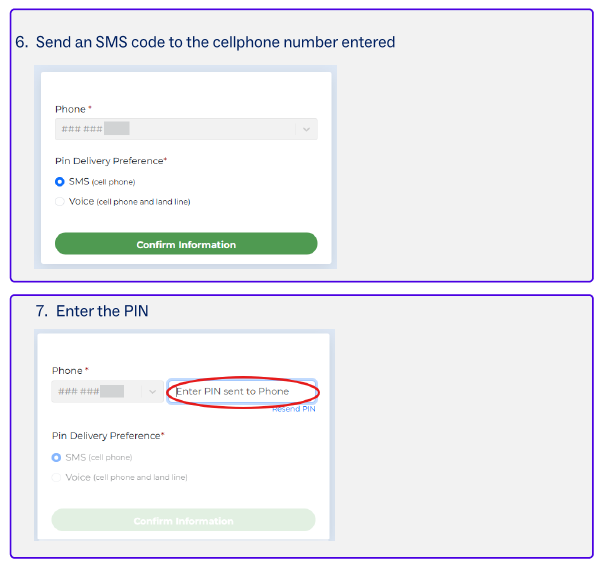
The image shows two instructional panels for verifying a phone number using an SMS PIN. Step 6 displays a form where a user selects SMS or voice as the PIN delivery preference and clicks a green Confirm Information button. Step 7 shows the same form with a red circle highlighting the field where the user must enter the PIN sent to the phone, along with an option to resend the PIN. The layout uses a simple interface with light background and green action buttons.

6.  On the next page, enter a new password that follows the Password Creation Policy.
7.
  Agree to the policy and select Reset Password.
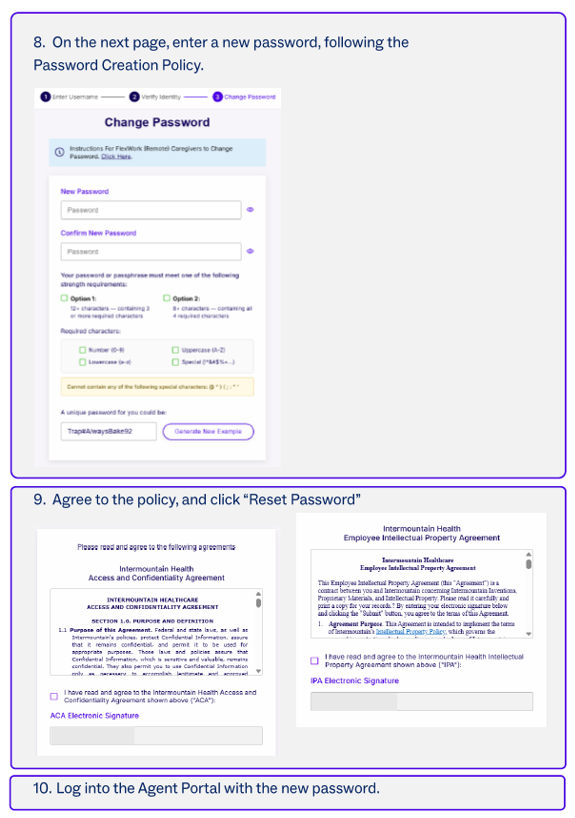
Instructional graphic showing steps to change a password and agree to policy terms. The top section displays a "Change Password" form with fields for new password, confirmation, and password rules. The lower section shows agreement documents with electronic signature options and a step to click "Reset Password". Step numbers 8 and 10 are visible, guiding users to complete the process and log into the agent portal with the new password.

8.  Log into the Agent Portal with your new password.